Dual Anleon S2T Rack Ears

Print Profile(1)

Bill of Materials
- 2mm M3 screws, countersunk head x 12: longer screws may work
- M3 nut, hex head x 4:
Description
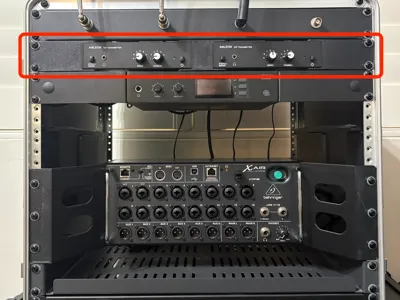
These parts form a 19 inch rack mounting kit for a pair of Anleon S2T Transmitters. It includes:
- left ear (attached to the left side of the left transmitter)
- right ear (attached to the right side of the right transmitter)
- middle bracket (attached to the right side of the left transmitter), and
- middle joiner piece (attached to the left side of the right transmitter).
I have them printed in PETG-HF in my rack. The provided print profile is designed for strength, including extra walls for rigidity and 0.56mm line width for good layer adhesion. Note that PETG shrinks when it cools so the print profile has the model scaled slightly to account for PETG-HF shrinkage - you may need to adjust that if you use a different filament.
You will need twelve 12mm M3 screws, with countersunk heads (longer screws may work). You will also need four M3 hex nuts.
To connect the ears to the transmitters:
- Remove the stick-on feet on the bottom and the two M3 screws on each side of each transmitter.
- Screw the left ear onto the left side of the left transmitter with two 12mm M3 countersunk screws, using the existing screw holes.
- Screw the right ear onto the right side of the right transmitter with two 12mm M3 countersunk screws, using the existing screw holes.
- Press fit the four M3 hex nuts into the insides of the two ribs of the middle joiner piece. The nuts are to be placed on the inside of the vertical holes. The middle joiner piece is the smaller of the two middle pieces and will not be visible from the front when fully assembled.
- Screw the middle joiner piece onto the left side of the right transmitter, with two 12mm M3 countersunk screws, using the existing screw holes.
- Screw the middle bracket onto the right side of the left transmitter, with two 12mm M3 countersunk screws, using the existing screw holes. The middle bracket is the larger of the two middle pieces and will be visible from the front when fully assembled.
- Join the two transmitters together by sliding the middle joiner piece into the middle bracket, lining up vertical holes.
- Use four 12mm M3 countersunk screws to securely fasten the middle joiner piece to the middle bracket.
- Mount the assembly into a 19 inch rack.
License
You may create derivative works based on this object, provided that all such derivative works are published exclusively on the MakerWorld platform and include proper attribution to the original creator. You may not share, upload, host, distribute, or publish this object—or any derivative work of this object—on any other digital platform, marketplace, or distribution channel. Commercial use of this object and any derivative works is strictly prohibited. This includes, but is not limited to, selling, renting, sublicensing, or using the object in any context in which you receive monetary compensation or other financial benefits.
Comment & Rating (1)