Bambu Lab P2S build plate automatic recognition QR code


Print Profile(3)


Description
Bambu Lab P2S build plate automatic recognition QR code
Brief description: This model is used for third-party build plates, allowing third-party build plates to be automatically recognized by the P2S chamber camera, and will not affect the printing of calibration lines; the white print layer count is 3 layers
A total of 4 QR code identifiers: Textured PEI plate, Smooth PEI plate, Engineering plate, Low-temperature plate (polyurea plate), stored in the same plate of the print profile
- You can also try other, more useful models created by others: Click here
Print profile slice view:


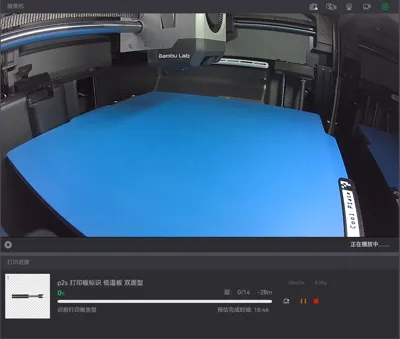
In-chamber view:


Calibration line relative position:


Customization (parameterization) instructions: (20251202: Online customization does not seem to support text-type parameters. Please select the appropriate file based on the description of Parameter C in the filename before proceeding with online customization, or download the original F3D file to generate it yourself in Fusion360)
- To generate using the F3D file yourself, you need to install the font file: OPTIAB.TTF (Full font name: Optical A Bold)
Currently supports 4 input parameters:
| Parameter Abbreviation | Parameter Name | Values and Comments |
|---|---|---|
| A | Build plate thickness | Unit: mm Recommended value: 0.6 (suitable for official textured PEI plates and common low-temperature plates) |
| B | Generate short version (single-sided) instead of long version (double-sided) | 0: Generate long version (double-sided) 1: Generate short version (single-sided) |
| C | Identifier type | 1: Textured PEI plate 2: Smooth PEI plate 3: Engineering plate 4: Low-temperature plate (polyurea plate) |
| D | Generate right-angle edge stopper | 0: Do not generate right-angle edge stopper 1: Generate right-angle edge stopper |
| E | Total length fine-tuning | If the protrusion at the bottom of your build plate is wider than the original build plate, please adjust this parameter appropriately, e.g., 1.0mm (Alternatively, you can set Parameter D to 0) |
| F | Custom text (Currently not supported for online customization) | When this parameter is 'None', the text will follow the default value of Parameter C; otherwise, the value of Parameter F will be used directly |
Illustration explanation:


Export instructions after customization: (Applicable for exporting to Bambu Studio after customization in Fusion360)
- Open the downloaded f3d file with Fusion360
- "Solid" → "Modify" menu → "Change Parameters"

- Modify the parameters listed in the table above
Then follow the export instructions in the video (bilibili.com/video/BV1zTC7B9EDo) to export a single 3mf file
Customization to printing operation instructions (Applicable for model files downloaded after online customization): (20251202: Online customization does not seem to support text-type parameters. Please select the appropriate file based on the description of Parameter C in the filename before proceeding with online customization, or download the original F3D file to generate it yourself in Fusion360)
- Click Customize, after filling in the parameters according to the table above, generate and download (Currently, neither downloading 3mf nor stl supports automatic distinction of filament based on f3d material information, so they are the same)
- Import into Bambu Studio to specify white filament and switch to the "Objects" interface

- Right-click the imported file → "Split" → "To Parts"

- Add a second type of filament (black filament)

- Select the parts ending with "_1" and "_4", right-click → "Set filament for selected parts" → select the second type of filament


- Slice and print
History:
20251228: As reminded by the comments section, it was found that changes to Parameter A in online customization may cause abnormal text status in the model, and the f3d file needs to be refactored
20251202: Updated F3d file to enhance customizability (Parameters E and F)
20251112: Updated to a customizable generation version
Comment & Rating (89)