Charlie Brown Christmas Dancing Kids Ornaments


Print Profile(1)

Description
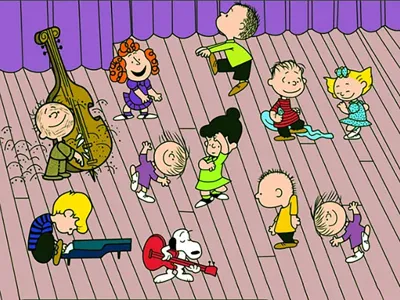
For me, it's not Christmas until I've watched the Charlie Brown dancing scene! I had been holding off making these characters since many require more than 4 colors (I only have one AMS). This year I decided to go ahead and use my favorite hack: Sharpie markers. I simply used white filament for the extra colors (see photo) and filled them in with markers.
A 0.2mm nozzle is a must to capture the fine detail of these models.
I split the kids into two parts, here is the other: Dancing Kids Part 2
No AMS (or in a hurry)? I also made a black and white outline version that uses only one filament per layer. This “coloring book” version looks great as-is or you can color in with a permanent marker or paint. Dancing Kids No AMS
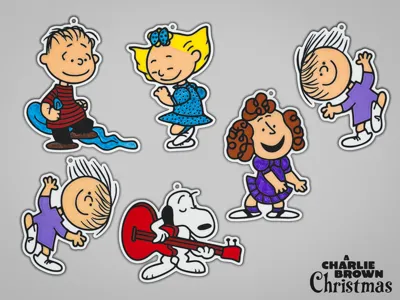
Wondering what the kid's names are? I was! Here's the list.
- Snoopy (of course)
- Pig-Pen on Bass
- Schroeder on the keyboard
- Linus with his blanket
- Sally Brown (blue dress)
- Frieda (with her natural curly hair and purple dress)
- Shermy (rocking a green shirt)
- Violet (green dress)
- 3, 4, and 555 (nicknamed 5) - Yes, their names are numbers, last name 95472 (accent on the 4). Apparently Charles Schulz objected to the zipcode system when it was introduced as he thought numbers were becoming too intrusive in society. 3 and 4 are the bouncy twins, 5 is in the yellow shirt.
Now you know!
If you like this model, check out our collection of ornaments based on Christmas Specials and Movies. Or if you like a good laugh visit our collection of Funny Christmas Ornaments, or our slightly naughty NSFW Funny Christmas Collection.
Tips and Tricks for ‘flat’ AMS designs like this:
- For this type of print, I recommend matte filaments, especially for white and other light colors because they are more opaque.
- My designs allow you to switch the backing color. I recommend using white unless you are sure your top colors will not show through.
- Missing a filament color? You can always print it white and use a permanent marker to color it in.
- For the smoothest top surface, I recommend flipping the design over and using a plate with excellent adhesion. I always reserve my newest SuperTack plate for the most detailed designs. Your print will only be as good as your first layer, so keep a close eye and restart if needed.
- Printing each layer with colors in order from lightest to darkest is best. My prints are set up to do this, but if you use different colors you can adjust the filament sequence in the plate settings.
- For detailed designs, a 0.2mm nozzle is a must - even though it seems painfully slow!
- In the Global slicer settings, enabling the “Interface shells” option under the “Strength” tab can help your prints look sharp. (If you don’t see this option, turn on “Develop Mode” in the slicer preferences).
- Another slicer setting to try is in the Quality tab in the Advanced section. Select “Not applied” for the “Only one wall on top surfaces” option.
Boost Me (for free)
If you like my designs, I would appreciate a boost!
License
You shall not share, sub-license, sell, rent, host, transfer, or distribute in any way the digital or 3D printed versions of this object, nor any other derivative work of this object in its digital or physical format (including - but not limited to - remixes of this object, and hosting on other digital platforms). The objects may not be used without permission in any way whatsoever in which you charge money, or collect fees.
Comment & Rating (3)