Cathedral Stained Glass - PETG Frame for Epoxy


Print Profile(1)

Description
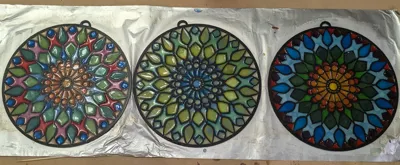
I have always had a love of stained glass especially in European churches and cathedrals. I have been testing a method of using my 3d printer to design the frame for a stained glass window, and then using epoxy to fill in the cells.
I am going to share my process here in case you want to replicate it. It is just a simple 11 step process. :)
1. Draw up an image using a sharpie, you want pretty thick lines and a relatively simple pattern with a solid border. (You could use chatgpt or some other tool to create the image, but I think you will find it much more satisfying to do your own design).
2. Take a picture of the image, and then load it into the “Image to keychain” function in makerlab. You will use that to convert the image into a 3d design, make the white background into transparent and then export it to be 3mm thick.
3. Print out the design, I would recommend black petg.
4. Get a nice flat board that you don't mind getting messy
5. Put some tinfoil down that fits the size of your stained glass window frame. (The tinfoil gives a nice clean flat surface)
6. Paint some mod podge so that it is thick on the tinfoil and is the same size as your window frame. (The mod podge keeps the frame held tightly to the tinfoil and prevents the resin from bleeding into the other cells.) Give it night to dry.
7. Get the epoxy materials: Epoxy mix, gloves, mixing cups, popsicle sticks, qtips, and needleless syringes for sucking up the resin and pushing it into the cells of your print.
8. Fill your cells with resin, and then give it 3-5 days to dry. (no touching to early or you will have fingerprints)
9. After several days of waiting (make sure that the resin is dry) and then peel off the tinfoil. The mod podge will make it stick so expect the tinfoil to come off sort of gummy.
10. Now you have a tough decision to make…. Either take hours with a wet cloth scrubbing off the remaining mod podge (not easy), or just let it fully dry and it will be almost completely clear. (I am all ears if someone has an easy way of removing the mod podge are a better material)
11. Your done.
(When these are fully dry, I will hang them and show you how they look with light coming in the window.
Boost Me (for free)
If you found this useful, give me a boost and I will create some more stained glass designs. Thanks!
You can check out my other designs at my homepage here: https://spencermann.com
It is a work in progress, but I hope to provide more information about my models, and some tips if you want to create your own.
License
You shall not share, sub-license, sell, rent, host, transfer, or distribute in any way the digital or 3D printed versions of this object, nor any other derivative work of this object in its digital or physical format (including - but not limited to - remixes of this object, and hosting on other digital platforms). The objects may not be used without permission in any way whatsoever in which you charge money, or collect fees.
Comment & Rating (7)