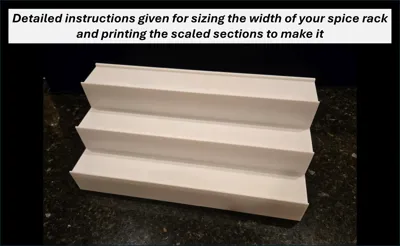
Custom Width Modular Spice Rack


Print Profile(4)


Description
This is a newly developed basic multi-tier spice rack with special consideration for extendibility and being printable across the full range of Bambu Lab printers. It was when I was just starting out with my Ender 3 Pro that I printed a simple rack for my daughter that met her needs but wasn't really well thought out. So when asked to print some extensions for it and now being more capable with SolidWorks modeling, I was inspired to design something new keeping it still relatively simple but enhanced for modularity and with a good balance between solid function and material cost.
There are three spice rack sectional profiles that are each designed for Z-dimensional scaling as follows. Note that each spice rack section is positioned on its side to be printable without the need for supports, thus the Z-direction represents the width of the rack section.
- A: Spice Rack V2 95mm: width scalable from 95mm to 129mm by adjusting the Z-dimension in Bambu Studio
- B: Spice Rack V2 130mm: width scalable from 130mm to 164mm by adjusting the Z-dimension in Bambu Studio
- C: Spice Rack V2 165mm: width scalable from 165mm to 325mm by adjusting the Z-dimension in Bambu Studio
The general concept is that once you've determined the overall width of your spice rack, if the width falls within the range of one of these profiles, and it's within your printer's Z-dimensional capability, then you can simply print the rack using a single section. If the overall width is greater than what you can print in a single section, you will need to print multiple sections that add up to the overall width. Multiple sections are placed side by side, and I've included features that allow for optional use of either 8mm diameter magnets or printable connection clips to help keep the complete rack “locked” together.
Note: When scaling a spice rack section, it should be always to make it wider (by increasing the Z-dimension). The design is not intended to be reduced below its original width as that would create angular overhangs at less than 45 degrees in the back wall. While not considered in this design, scaling the height or depth of the rack might be possible for those that are looking to be adventurous.
Sizing your Spice Rack and determining what sections to print
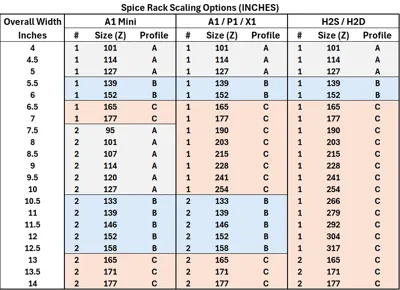
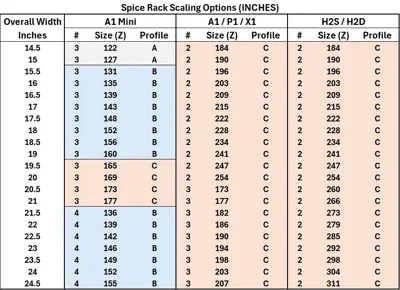
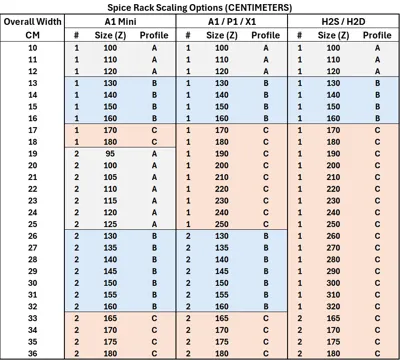
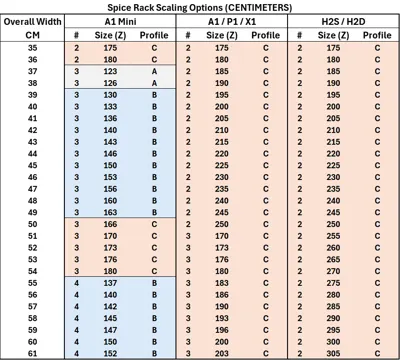
Use the following tables to determine what sections to print based on overall width and printer type. The overall width of your rack is expected to be measured in either inches (rounded down to the nearest ½ inch) or centimeters (round down to the nearest cm). All Z-dimensional values to be set in the profile are given in millimeters (mm).
Example when using inches: Let's say you want the overall width of your spice rack to be 12 inches. Based on the table below, if you are printing this on an A1 Mini, A1, P-series (P1P, P1S or P2S), or X1C, you need to print two sections using the “B” profile and setting the Z-dimension of those sections to 152mm. If you have an H2-series printer, you can print a single section using the “C” profile with the Z-dimension set to 304mm, or, if you prefer printing something not quite so large, you can choose to print it as two sections ("B" at 152mm) as done for the other printers.


Example when using centimeters: Let's say you want the overall width of your spice rack to be 40 centimeters. Based on the table below, if you are printing this on an A1 Mini, you need to print three sections using the “B” profile and setting the Z-dimension of those sections to 133mm. If you have an A1, P-series, X1C, or H2-series printer, you will need to print two sections using the “C” profile with the Z-dimension set to 200mm.


Instructions for setting the Z-dimension and printing your Spice Rack sections
Once you have determined the number of sections to print with which profile (A, B or C) and the Z-dimension setting, its time to open Bambu Studio with the correct profile selected above.
| Important note for the A1 Mini: This model is exactly 180mm from front to back so if the model does not appear to fit on the build plate, make sure that you use the mouse to move the model to be at least mostly on the plate and then use the “Center” command, available by right clicking on the model, to get it perfectly placed in the middle of the build plate - at this point, it should be OK to proceed with scaling and printing. |
Example: Let's use the earlier example where we have an H2D printer and we want to produce an overall Spice Rack that is 40cm wide. From the tables above, it was determined that you will need two sections using profile C and a Z-dimension of 200mm. After opening the profile in Bambu Studio, in this example the C: Spice Rack V2 165mm profile, the following illustration below covers the first three steps. First, select the model by clicking on it with the mouse. Then click on the scaling tool and make sure that the “uniform scale” feature is deselected by clicking to remove the check in the box next to it.

In our example, we need to set the Z-dimension to 200mm. Where the Size under the Z column initially is 165mm, enter 200mm - when you click away from this entry field, the screen will update to reflect the resized model. At this point, you can click on the Slice plate button to proceed.

Note: For the A1, P-series, X1C and H2-series, you can choose to print two sections at the same time as illustrated in the following two examples.
For the H2-series printers, after rotating a clone of the model 180 degrees, auto arrange will likely place the two models as shown in the example below.

For printers with a 256mm build plate, you may have to move the models to positions that allow them to wrap around each other as shown in the following illustration.

Assembly Instructions
Assembly can be as simple as placing your Spice Rack sections side-by-side. Optional: Magnets or printable Spice Rack Clips can be used for “locking” your spice rack sections together. Each side of the rack has two built-in locations for making the connections.

Using magnets to connect sections: The rack is designed for use with neodymium magnets that have a diameter of 8mm. I have found that connect two sections is best done with eight D8x3 magnets (Maker's Supply CA008), with two magnets on each side of the connection interface areas in the two connection locations.

Using Spice Rack Clips to connect sections: The Spice Rack Clips profile has three build plates to choose from with each plate having clips with different size gaps. For the Z-dimension you choose to print, select the correct clips based on the Z-dimension scale percentage - the build plates are labeled by % range to assist in the selection.
| I hope that some will find this a fun and useful project. Please share any makes and how you are using the rack sections as it might inspire others to join in on the fun. Thanks! |
| Special Note: For those of us that really enjoy watching our printers doing what they do best, the most interesting part of printing the Spice Rack model comes over the last 40-70 layers (depends on scaling), and especially over the last 6-9 layers of printing the model. This is where the two upper “locking” connection locations are being formed and the overhanging connection surfaces are printed at the beginning of the last five layers. The reason that I've restricted this area to 8mm in width is because our printers should be able to readily bridge that distance without the need for supports. |
Boost Me (for free)
Model developers like myself can always do with a bit of encouragement. Posting a rating with pictures, tagging our models with a Like, or even giving us a Boost is always appreciated. Thanks!
Documentation (1)
License
You shall not share, sub-license, sell, rent, host, transfer, or distribute in any way the digital or 3D printed versions of this object, nor any other derivative work of this object in its digital or physical format (including - but not limited to - remixes of this object, and hosting on other digital platforms). The objects may not be used without permission in any way whatsoever in which you charge money, or collect fees.
Comment & Rating (41)