Fein Shop Vac Cyclone Dust Extractor V2


Print Profile(1)

Bill of Materials


- 3mm (.118' in) O-Ring Cord Stock x 1: https://www.amazon.com/Buna-N-Ring-Durometer-Thickness-10/dp/B00QVB6CIG
- 2-1/2 in. x 7 ft. Dual-Flex Tug-A-Long Locking Vacuum Hose for RIDGID Wet/Dry Shop Vacuums x 1: https://www.homedepot.com/p/RIDGID-2-1-2-in-x-7-ft-LA2520-DUAL-FLEX-Locking-Vacuum-Hose-Kit-Accessory-Shop-Vacuum-Attachment-for-RIDGID-Wet-Dry-Vacs-LA2520/305626325
- M4 Hex Socket Head Cap Self-Tapping Screw x 1: https://www.amazon.com/uxcell-Self-Tapping-M4x12mm-Stainless-Hexagon/dp/B0D4DZ71NM
- 1-1/4 in. x 16 ft. Endless Loop Ratchet Tie-Down Strap x 1: https://www.homedepot.com/pep/Husky-1-1-4-in-x-16-ft-Endless-Loop-Ratchet-Tie-Down-Strap-FH0881/206802386
- Tap Acrylic Cement x 1: https://www.tapplastics.com/product/repair_products/plastic_adhesives/tap_acrylic_cement/130
- Small BD-25/2 Hypo Applicator x 1: https://www.tapplastics.com/product/plastics/fabrication-tools/hypo_type_solvent_cement_applicator/409
Description
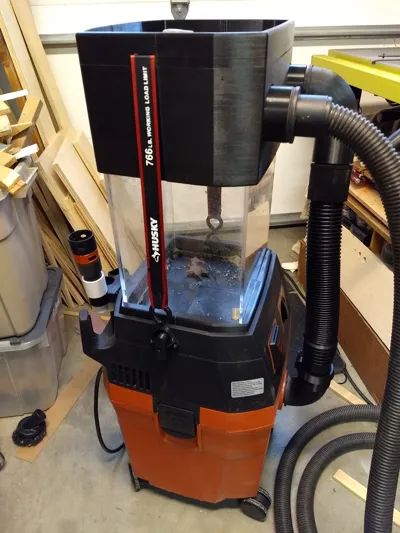
I do a lot of wood working and I bought a Fein shop vac to replace a Craftsman that I had had for 20 years. The Craftsman was still working, but it was deafening, at about 98 dB. The Fein is about as loud as the vacuum that we use in the house, closer to 70 dB. The Fein has much more suction than the Craftsman, but it can’t hold as much waste, and it uses $7 bags.
After my last woodworking project, I decided that I should get a cyclone separator for it, to save money on the bags. I looked at several options, and I came across the separator that Festool offers for their shop vac. It is integrated with their vac, fitting neatly on top of it. I decided that, that was the way to go.
There are basically two types of ‘cyclones’ used for separators: Cone and Spool. Most commercial offerings are Cone designs, so I started there. The Cone based design would have probably worked fine as a separator, but I had a number of issues with it:
• It was tall! And the return hose back to the vac, coming out the top, would make it even taller.
• The bottom of the cone limited the tray space available on the top for tools.
• It raised the point where the hose would attach very high, making it more likely to tip over the vac if I pulled on the hose very hard.
• And it was sort of ugly.
I settled on the Spool based design, which isn’t quite as efficient a separator, but it’s a lot more compact and addressed all of the issues above. The important part of designing an add-on cyclone dust separator is holding a good vacuum. You want to eliminate, or at least minimize any vacuum leaks. I printed seals for the hoses using TPU filament. For the seals that were too big to print as a single part, I used a 3mm o-ring cord, which can be cut to length and the ends superglued together to form an o-ring seal.
There is a short video of it swirling some dust here https://youtu.be/r2lwxvMISYQ.
I also included some adapters that I designed, which allow me to use my old 1.25 inch ID Craftsman attachments. If you have a Fein shop vac, you might want to print these, ever if you don't make the cyclone.
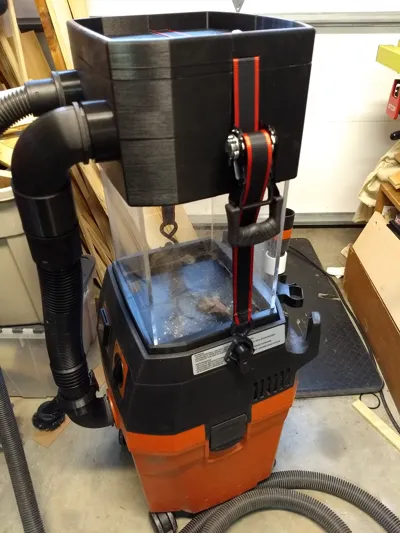
Here is a video with more details on how it is assembled and it working. I have been using this for 5 years now and I've only had to replace one bag over that period. This design uses big parts (310x270mm), which take a lot of time and filament to print. The overall print time is about 65 hours on a H2D, and it takes about 3.5 kg of filament to print. I printed the original one in PLA and other than the Hook Mounts, it has held up well. After 4 years, one of the hook mounts broke after tightening the strap too much, so I have since increased the Wall Loops and density of the Hook Mounts and changed the material to PETG to solve the problem.
The Fein is a great vac. I recently used it to suck the dirt and gravel out of 3 ft deep post holes for a fence that I was rebuilding, and the cyclone worked great.
https://www.youtube.com/watch?v=WYI9K-U88Ws
Note that the ends of the Fein_Hose_adapter_1.STL and Fein_Hose_adapter_2.STL files are filled in. The 'fills' are actually supports that I created manually. There is a 0.2mm gap between the supports and the part. Print the parts (without enabling supports), then snap the 'fills' off with a pair of pliers.
I would suggest printing the parts in either PETG or ABS. So if it’s left in the sun, they are less likely to warp.
Flexible Hose
The flexible hose that I used is a 2-1/2 in. x 7 ft. Dual-Flex Tug-A-Long Locking Vacuum Hose for RIDGID Wet/Dry Shop Vacuums (part number LA2520) from Home Depot.
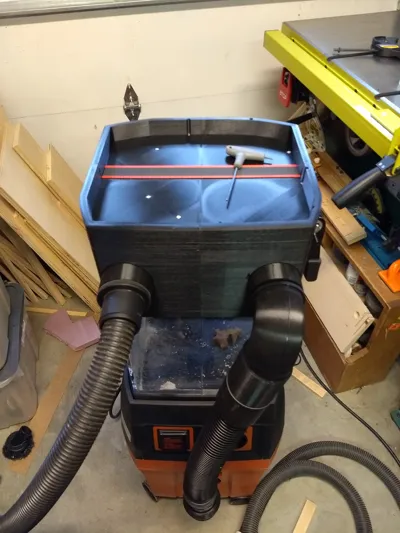
Clear acrylic plastic sheet.
4 pieces are needed to make a box with 268mm wide x228mm deep outside dimensions. I cut all the pieces about 300mm long, which sets the height of the box. You can make it as tall as you want. Just remember that the taller it is, the easier it is to pull it over if you yank on the hose.
The acrylic that I used was 5.8 mm thick, so I used the following dimensions for the acrylic sheets. Depending on the thickness of the acrylic sheets that you use, you will have to adjust the width of the sides.
- (2) Front and back 268x300mm
- (2) Sides 216.4x300mm
The sheets were glued together with TAP Acrylic Cement. The Acrylic Cement that I used also sealed the acrylic sheets with the PLA base. If you use this adhesive, then I highly recommend the Small Hypo Applicator. Both are listed below. This stuff is highly volatile. It will adhere in seconds, and will completely set overnight, but if you wait more thay about 15 seconds, then it will evaporate, and you will need to apply it again. It also works great for attaching PLA parts together. Also beware that it has a VERY low viscosity. It will wick down a part in an instant, and if not tightly sealed, a bottle can evaporate away in a day. And it is flammable, and should only be used in a well ventilated space.
Tie Down
I used a Husky 16 ft.x 1-1/4 endless loop ratchet tie down, which I had lying around, but any 33mm wide strap should work.
Other Hose Adapters
I also included two STL files for adapters for the Fein hose that designed when I first got the vac, which allow me to connect all my old Craftsman vac 1.25 inch ID attachments to it.
The Figure 1 shows the Fein supplied hose adapter (black and orange) that includes an adjustable vent (orange) which allows you to reduce the vacuum. The Fein adapter is a little too large in diameter for 1.25 inch attachments. So attached to it is my Fein Hose adapter 1 (white and in figure 2), which slides onto the Fein adapter and is compatible with 1.25 inch attachments.
Figure 1 - Fein hose adapter with my 1.25 ID adapter (white) attached.

Figure 2 - Adapter 1, Fein hose adapter to 1.25 inch adapter, described above.

The Fein/Adapter 1 combination shown in Figure 1 was rather bulky, and I never used the vent, so I designed the Fein Hose adapter 2 (figure 3), which clips onto the end of the Fein hose, and replaces the two parts in the first figure. It's a tight fit, but it works great and it can take a lot of abuse.
Figure 3 - Adapter 2, Fein Hose end to 1.25 inch adapter.

Assembly
Components
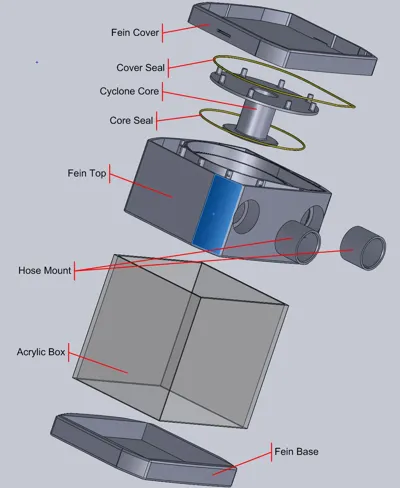
Figure 4 identifies the various components, and how they are assembled. The component names in the Figure match
the prefixes of the associated STL file names.
The Dust Extractor consists of 5 major components: Main Body, Upper Elbow, Rigid Adapter, and the Hook Mounts.
Figure 4 - Components

Seals
There are 3 ‘seals’ in the Top: Cover, Core, and Box, refer to figure 5 below. 3mm O-Ring Cord is used to make the seals. O-Ring Cord can be bought on Ebay or Amazon.
Each seal fits in a 3mm wide 1.75mm deep slot. For each seal, cut the end of the cord square, then lay the cord in the respective slot until it meets the other end. Then cut the cord about 1mm longer. The ends of the O-Ring Cord can be superglued together to make an O-Ring,
just make sure that both ends of the cord are square. Once glued, press the O-Ring Cords into their respective slots.
Main Body
Figure 5 illustrates the components of the Main Body. The component names in the Figure match the prefixes of the associated STL file names.
Figure 5 - Main Body Assembly

The hose that comes with the Fein uses a tab, which slips into a slot on the front of the vac, and is turned clockwise about 40 degrees to lock the hose in place. I used the same interface to mount the hoses.
There are 2 Hose Mount parts on the front of the Top. The Inlet is on the left and the Outlet is on the right. The Hose Mounts are not integrated into the Top, so they can be redesigned if you want to use the separator with a different vac or hoses. Which means that they need to be glued in.
The Outlet Hose Mount orientation is important!
In the Fein, the slot that the tab on the hose slips into is on the top of the mount (12:00). I used the same orientation when I glued the Inlet Hose Mount to the Top, see figure 6 below.
The tab of the ‘Elbow’ part (Hose Coupling Rt Angle.STL) is oriented so the elbow faces up when inserted into the Fein Vacuum inlet. To
use the same part for the Upper Elbow Assembly and have the elbow point in the right direction when it is inserted into the Outlet Hose Mount, then then the slot in the Outlet Hose Mount must be spun around to about the 6:30 position before gluing it in.
Figure 6 - Hose Mount Orientations

The Cyclone Core is printed in two parts: Cyclone Core 2 Top.STL and Cyclone Core 2 Bottom.STL so I wouldn’t have to use supports. Glue these components together so they look like the image in Figure 5.
There are 10 M3 screws that are used to attach the Fein Cover to the Fein Top. In the Fein Top, insert 10 Square Nuts into their respective slots.
With the seals in place, insert the Cyclone Core into the Fein Top, and use 10 M3x30 screws to attach the Fein Cover to the Fein Top.
Base and Acrylic Box
Cut the acrylic plastic and fit the Box to the Base (Figure 5). I had a snug fit when I pressed them into the Base, and used a strap clamp to hold the pieces together at the top. Once I had all the sides positioned, I ran a bead of solvent down the 4 inside corners and around the bottom on the inside of the Box.
After the side solvent dried, I ran some more solvent around the outside joint between the acrylic panels and the Base. I did this a couple of times, until I saw that I had completely sealed all the parts together.
When you cut the acrylic they will have saw marks (scratches) on the edges. If you have a good blade on your saw, the saw marks will be minimal and the solvent will cleanly bond the pieces at the corners. If you don’t, then you may have to run a file along the edges to smooth
them.
If you have clean edges on the sides of the acrylic, then the scratches on the edges will disappear when you apply the solvent.
Flame Smoothing (optional)
You can ‘flame smooth’ the edges of front and back sheets to remove the saw marks. To flame smooth, simply take a propane torch, and wave the flame back and forth along the edge. The heat will melt the acrylic smooth. It happens sort of suddenly, so be ready to back the flame off fast. If you have any deep saw marks on the edges, file them out before you try to smooth them. I did not flame smooths edges that I glued. Also, practice on some scraps first. It is easy to apply too much heat, and either bubble, deform or burn the acrylic.
Hook Mounts
A ratchet tie is used down to hold the main body to the shop vac. The nylon strap of the ratchet tie down goes through two slots in the Fein Cover and hangs down so the hooks on either end can attach to the Hook Mounts. To attach the Hook mounts drill 3mm (1/8) in holes in the top of the shop vac on each side and use three #8 x 1/2in Pan Head sheet metal screws to attach the Hook Mounts.
Be careful not to strip the screw holes by using too much torque on the screws.
Also when you use the ratchet to tighten the tie down to hold the Extractor on the vac, just snug it up so it doesn’t move. There’s no need to crush it.
Rigid Hose Adapter
A Rigid “Tug-A-Long” Dual Flex Locking Hose (part number LA2520) is used to connect the separator to the vac. It comes with a variety of
adapters.
The ends of the Rigid hose are designed to support different adapters. I used the ‘locking hose adapter’ with the ribs on one end, and cut the other end of the hose to length. To attach the cut off end of the hose to the Upper Elbow, I designed a ‘Rigid to Fein’ adapter (the Hose
Coupling Rigid a and b.STLs on Plate 6), which uses the Fein style hose interface with the tab on one end, and an interface for the cut off end of the Rigid hose on the other. These files include a custom supports, which can be snapped out after printing, so no ‘support’ option is required for them in the Slicer. Do not glue the halves together until you are ready to fit the connecting hose to length, which was the last thing I did.
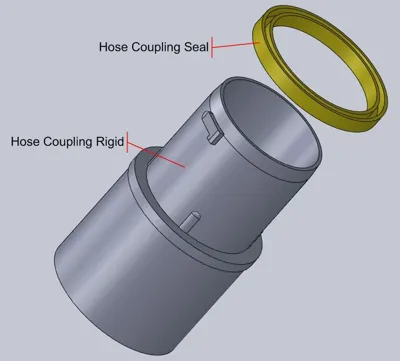
The Hose Coupling Rigid adapter is designed to fit on the cut off end of the hose. It is in two parts, so they can glued together to firmly hold the end of the cut off end of the hose. See figure 7.
Figure 7 - Hose Coupling Rigid adapter

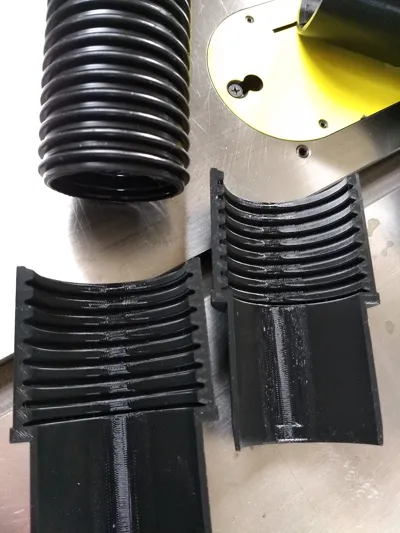
Figure 8 - Hose Coupling Rigid adapter fitted before gluing

After applying the glue, use some wood clamps to hold the two pieces tight together while they dry.
The component names in Figure 9 match the prefixes of the associated STL file names.
Figure 9 - Hose Coupling Rigid and Seal

The Hose Coupling Seal was printed for the Fein end with (95A) TPU filament to make it flexible, and be able to seal the coupling. The seal does not need to be glued in place.
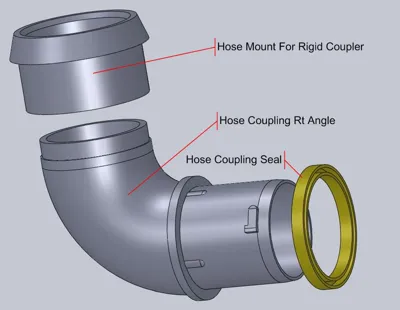
Upper Elbow
The Upper Elbow (Plate 5) uses the Fein style hose interface on both ends.
The orientation of the Hose Mount For Elbow slot doesn’t matter because the inter-connecting hose can rotate. Glue it to the Hose Coupling Rt Angle part. To avoid supports, also include Hose Coupling Rt Angle a and b STL files are included, which must be glued together.
Figure 10 - Upper Elbow

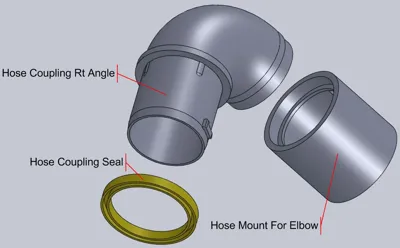
Lower Elbow
The Lower Elbow uses the Fein style hose interface on one end, and a Rigid interface on the other. Again, the Hose Coupling Seal was printed with TPU filament to make it flexible, and to seal the coupling. The seal does not need to be glued.
A Rigid “Tug-A-Long” Dual Flex Locking Hose (part number LA2520) is used to connect the separator to the vac. The orientation of the Hose Mount For Rigid Coupler doesn’t matter. Glue it to the Hose Coupling Rt Angle part.
Use the same Hose Coupling Rt Angle STLs for the Lower Elbow as the Upper Elbow, see above.
Figure 11 - Lower Elbow

Some Notes on Gluing PLA…
I purchased the Bottle Applicator and Acrylic Cement (also called ‘Acrylic Solvent’) from Tap Plastics. See the Other Parts list below for links.
The Tap Plastics web page says that the Acrylic Cement is for INDUSTRIAL USE ONLY. This is because it is made up of Methylene Chloride (75-09-2), Trichloroethylene (79-01-6) and Methyl Methacrylate Monomer (80-62-6). ONLY use in a well ventilated area!!! Not only does it smell bad, but inhaling it can hurt you. So treat it with respect. Fortunately a little of it goes a long way, so the fumes from tiny drops are minimal. And don’t forget that it is also flammable!
This is probably the most volatile stuff that I’ve ever used. When it comes to evaporation, it makes alcohol look like motor oil. There was an 1/8 inch of it in the bottom of the Bottle Applicator and it was gone the next day. And this was with the syringe top tightly screwed on, and the cap on it. Also, after 4 months of sitting the garage a 4 oz. container of the stuff that was almost full when I put it on the shelf, was empty! I found that the seal on the container had a leak. After tightening as hard as I could, I could tip the container and the cement would still drip out. My solution, which has worked pretty well, was to store the Cement container in a coffee can with a tight fitting plastic cap. My theory was that, even with the leaky Cement container, the solvent vapor pressure would equalize inside the coffee can, and slow the evaporation process. But hold the coffee can away from you when you open it, otherwise you will get an eye watering whiff of the stuff.
To fill the Bottle Applicator, just squeeze some air out of it, then stick the syringe into the can of cement. It takes a minute, but the cement will be sucked into the bottle. I found that I never needed very much. An 1/8th of an inch in the hypo applicator bottle, will go a long way. Besides anything you leave in the applicator will evaporate away within a day.
The solvent leaves a little residue when it dries, which can clog the tube (syringe) of the Bottle Applicator. When you are done using it, squeeze the remaining solvent back into the can. And be sure to squeeze the bottle a couple of times to pump some air through the
syringe to clear the solvent out of it. A couple of times (despite my best efforts) the syringe has clogged, and I had to heat the end with a match to burn the residue out. A problem with using heat is that the heat can anneal the syringe, and make it very easy to bend.
Also…
When using this Cement with the Bottle Applicator, its volatility comes into play. Normally you tip the Applicator and give it a squeeze to get a single drop of cement to come out, then relax your grip to cause an additional glue to be sucked back up the syringe. But because this cement is so volatile, the heat from your fingers causes it to expand, so instead of a single drop, the expansion of the solvent inside the bottle causes it to start dripping or squirt out immediately, even if you stop squeezing. This will flood your print with glue if the syringe is against it and make a mess. I found the best way to get a single drop was to hold the bottle for a short amount of time to allow the cement to warm up, then hold the tip of the applicator above a piece of cardboard, quickly tilt it to get a drop to come out, then tilt it back immediately, but no so much that the solvent reaches the end of the syringe inside the bottle. The ‘tilt back’ causes the drop of solvent to slide back to the working end of the syringe, without additional drips landing on your work. Note; this only works if there is just a little solvent in the bottle.
25/9/5
V2 - Initial release.
Comment & Rating (5)