Klipper 3D Printer Servo Armed A1 Nozzle wiper


Print Profile(0)
Bill of Materials
Description
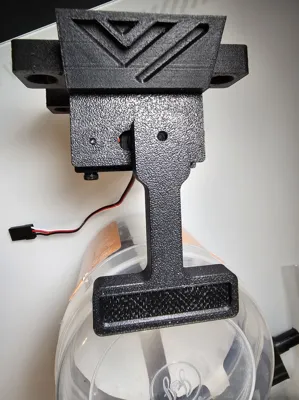
In Action:
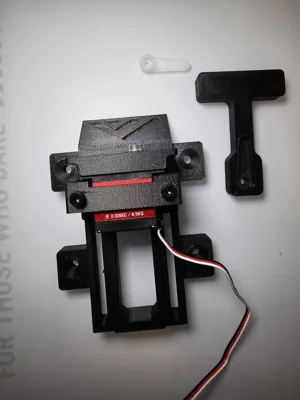
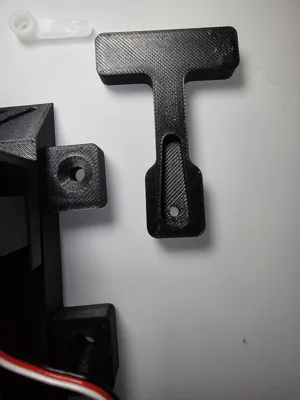
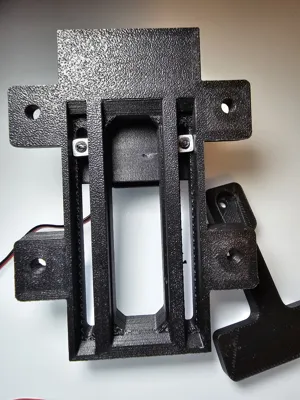
Added Additional screw holes to secure the system to a flat surface.
Added screw holes to secure the Servo motor. Use M2.5x15mm screws.
Purchase Servo from here (AGFRC B13DLM V2 4.5KG) : https://s.click.aliexpress.com/e/_okWuwF7
Use M3 Square Nuts and M3 x30mm screws to fix the servo slider, servo and the servo bracket to the base.
Use Bambulab A1 Nozzle wiping Pad.
The Wiper Arm Model is split into 2 Bodes if you need to Lengthen it Or you can use the arm from the Original Printables Model.
In Klipper Config / .cfg file use the following: (This is for BTT Octopus Pro).
To Move the servo arm, just type “SET_SERVO SERVO=wipeServo ANGLE=115” In the console to change its angle. Change the 115 Number to desired Number.
!!!!Only use my Print _Start Gcode macro as a Guide to adjust yours.!!!
Add servo info: 5v 1.2 Amps minimum. If you want max speed and torque, 8.4V and 2Amps.
[servo wipeServo]
pin: PG13 ( your mainboard pin, i use estop port on my octopus pro, THE PORT NEEDS TO SEND 5V GND AND Signal)
minimum_pulse_width: 0.0005
maximum_pulse_width: 0.0025
maximum_servo_angle: 180
initial_angle: 0
#initial_pulse_width: 0.0015
Add a gcode macro:
[gcode_macro CLEAN_NOZZLE]
gcode:
G1 Z 35
SET_SERVO SERVO=wipeServo ANGLE=115
G4 P1500
G1 X45 Y104 F6000 ; Start position Wiper
G1 X10 F6000 ; End position Wiper
G1 X45 F6000 ; Start position Wiper
G1 X10 F6000 ; End position Wiper
G1 X45 F6000
G1 X10 F6000
G1 X5 Y104 F6000 ; Custom position after wipe
SET_SERVO SERVO=wipeServo ANGLE=0 ; Move servo back to 0 degrees
G4 P1000 ; Wait 1 second to ensure servo moves before finishing
#SET_SERVO SERVO=wipeServo WIDTH=0
#[gcode_macro CETRACT_WIPER]
#gcode:
#SET_SERVO SERVO=wipeServo WIDTH=0
Insert CLEAN_NOZZLE line in print start gcode:
[gcode_macro START_PRINT]
gcode:
{% set BED_TEMP = params.BED_TEMP|default(36)|float %}
{% set EXTRUDER_TEMP = params.EXTRUDER_TEMP|default(220)|float %}
{% set FL_SIZE = params.SIZE|default("0_0_0_0")|string %}
#SFS_DISABLE
SET_GCODE_OFFSET Z=0
BED_MESH_CLEAR
#CLEAR_PAUSE
G28 # Home the printer
M140 S{BED_TEMP} # Start bed heating
M109 S180 #preheat nozzle to probing temp
CLEAN_NOZZLE
#G1 Z5 F3000 # Move the nozzle near the bed
#M104 S{EXTRUDER_TEMP}
#G90 ; Use absolute coordinates
# Reset the G-Code Z offset (adjust Z offset if needed)
G28
M190 S{BED_TEMP} #wait on bed temperature
#Z_TILT_ADJUST # Adjust Z tilt for 2 Z axis
#G32
#G29
G28 Z METHOD=CONTACT CALIBRATE=1 ; calibrate z offset and beacon model hot
Z_TILT_ADJUST ; or QGL to balance towers
BED_MESH_CALIBRATE RUNS=2 ADAPTIVE=1 ; bed mesh in scan mode
#WIPE_NOZZLE
G28 Z METHOD=CONTACT CALIBRATE=0 ; calibrate z offset only after tilt/mesh
#M104 S{EXTRUDER} ; set extruder to print temp
#M109 S{EXTRUDER} ; wait for extruder temp
SET_GCODE_OFFSET Z=0.04 ; add a little offset for hotend thermal expansion ; needs fine tuning, long meltzones require more
#SET_GCODE_OFFSET Z_ADJUST={OFFSET} ; apply optional material squish via slicer
#BED_MESH_CALIBRATE ADAPTIVE=1
G1 Z5 F3000
M104 S{EXTRUDER_TEMP} #set extruder to print temp
M109 S{EXTRUDER_TEMP} #wait for extruder temp
CLEAN_NOZZLE
G0 X8 Y40 F9000 ; Go to 15mm from the front
G0 Z0.2 ; Drop to bed
G92 E0 ; zero the extruded length
PRIME_LINE
G1 Z5 ; Raise Z 5mm and begin printing.
#SKEW_PROFILE LOAD=calilantern_skew_profile
# Move the nozzle very close to the bed
#G1 X175 Y175 Z0.2 F6000
#BED_MESH_PROFILE LOAD=default
Boost Me (for free)
This remix is based on

License
You shall not share, sub-license, sell, rent, host, transfer, or distribute in any way the digital or 3D printed versions of this object, nor any other derivative work of this object in its digital or physical format (including - but not limited to - remixes of this object, and hosting on other digital platforms). The objects may not be used without permission in any way whatsoever in which you charge money, or collect fees.
Comment & Rating (0)