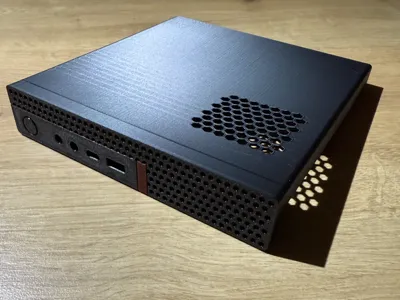
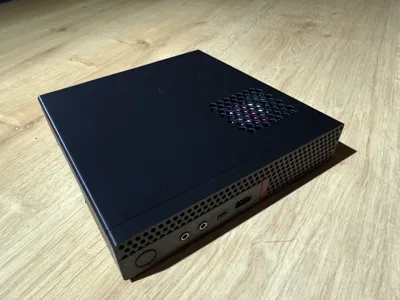
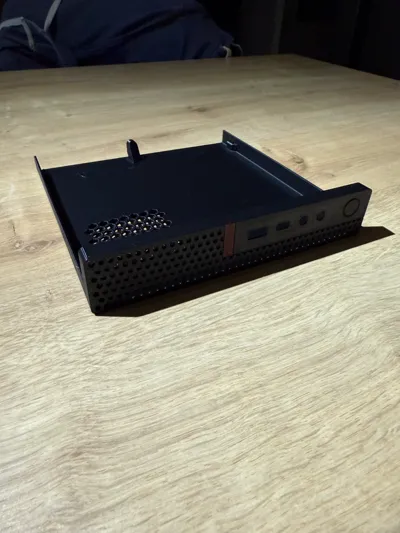
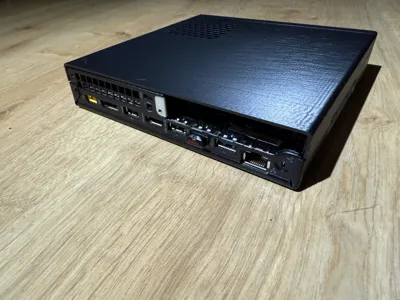
Search models, users, collections, and posts

Lenovo Tiny Lid

Print Profile(1)

All
P1S
P1P
X2D
A1
X1
H2D Pro
X1 Carbon
H2C
H2S
X1E
H2D
P2S
A2L

0.2mm layer, 2 walls, 15% infill
Designer
3.8 h
1 plate
4.9(7)

Open in Bambu Studio
Boost
169
439
80
23
859
170
Released 

Description

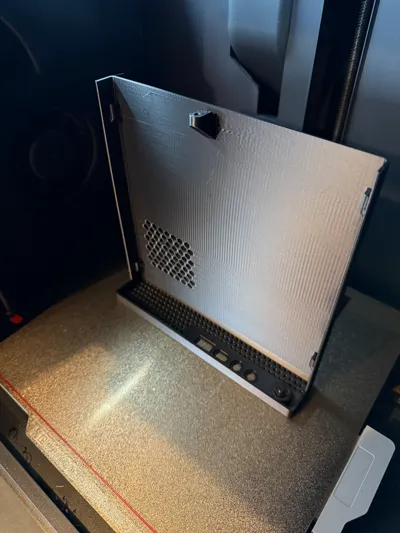
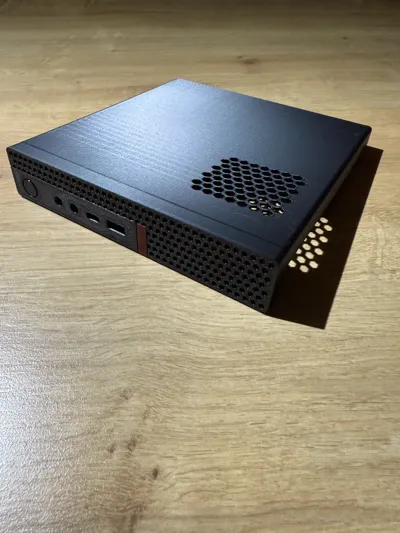
Replacement case for Lenovo Tiny PC. may fit numerous models, was modelled on p330 and m920q.

Extra vents added to top to increase airflow to fan.

Printed in PETG but may work ok with other materials.

 I tried to keep as close to the original as possible but had to modify a few areas to allow for FDM limitations.


If the power button is a bit stiff or stuck, you may need to free it off by giving it a bit of a push from the inside 👍


There is a fully vented version in STL/CAD files.


Boost Me (for free)

hope you find my model useful, if you do, please consider boosting me.

Comment & Rating (80)

(0/1000)

Exactly what I've been looking for, for a long time. Other models on the net were not what I needed. Since I wanted to mount this model on my Lenovo m720q with a fan mod, I have to change the Top a bit. I have expanded the honeycomb grid so that it offers significantly more area for cooling with a 140mm Noctua fans. The lid fits perfectly, even with my changes For the control of the 140mm Noctua fan, I used a fan control from Noctua, which can be connected to USB. With this fan control you can adjust the fan steplessly and even protect it against an unintentional stop due to too low speed. I have attached the Noctua 140mm fan with the enclosed Noctua dampers. As protection against unwanted contact with the fingers, I have mounted a fan grille in the honeycomb design. The Lenovo model is an M720Q with i5-9500T, 64GB RAM, 2TB m.2 NVME, 1TB Sata SSD and an Intel x520-DA2 dual-port 10-Gigabit network card.
The designer has replied
7
Reply
Thanks for the review and the boost, those 10gbe cards put out a ton of heat so I can see why you’ve gone down this route. Glad it all worked out ok
1
Reply
Great design! Would you mind posting it?
5
Reply
Replying to @ealott :
Sorry for the late reply, notifications are not always sent. Since I am a beginner, can I upload the design here or do I have to upload it in my own profile?
1
Reply
Fits my Lenovo ThinkStation P330 Tiny fine. Printed in Bambu PETG-HF using 0.20 Strength profile.
The designer has replied
designer
7
Reply
Thanks for your kind words, Looks good, glad you like it.
0
Reply
Where can I download this. This is exactly what I'm looking for. Tks
0
Reply
Replying to @Armanie55 :
I see it. Tks mate!
0
Reply
Print Profile
0.2mm layer, 2 walls, 15% infill
Modified for M910x and Intel ARC A310 Modified connectors, front USB, power button, and add two holes for the fans. The graphics card slides in, rubbing against the cover, and the plastic on the GPU rubs against the cover, but it fits and works.
(Edited)
The profile uploader has replied
profile
7
Reply
Nice work, thanks for the 5 star rating 👍
0
Reply
wow this looks really nice. Can you share the edited file? I happen to have a P320 which is a same variant of the 910x.
0
Reply
Replying to @user_4017881689 :
I am sorry I cannot share files of this model the license does not allow it 😢
Show original
0
Reply
Boosted
Thank you for making this. I do have a couple of questions: 1. The holes on the top of the lid are for the CPU fan to pull the air in? 2. How sturdy is the lid? Thanks again for making the model.
The designer has replied
0
Reply
Glad you like it, it took a while to get the fit just right. Yes the hole are to help the fan intake. As for how sturdy it is, I have a stack of 6 without any issues and 2 of them are the dual drive versions of my lid. As long as whatever is stacked has its weight on the outlet edges, it should be ok with quite a bit. I wouldn’t place anything in the centre though as while it’ll probably be ok, that is definitely the weakest point. If you do stack these units, make sure they have feet otherwise the fan vents will be redundant.
0
Reply
Boosted
Replying to @Reefie :
@Reefie Here's the result of the modified lid I've made. Basically I've added another set of intake holes for the discreet GPU and cut the lid in two to have the front panel separate. Printed larger part using PETG and the front bezel using PLA. Thank you again for sharing your work.
4
Reply
Replying to @t0ys :
Nice work. Could you share your modified STL files?
0
Reply
Fits like a glove! One question, how do i get the power button to work? Mine appears locked in place because of the print.
The designer has replied
0
Reply
It does that sometimes especially if the filament is damp. You can try pushing it quite hard but be careful not to push it to far as it may snap, if it does snap, it’ll remain trapped and will still work using the resistance of the microswitch
0
Reply
Replying to @Reefie :
I had mine 3D printed online, so if there was a step that needed to be done when it came off the printer, it might be too late. Pushed on it pretty solid. It doesn't seem to break loose. Is there something I need to clip here? Or I'm happy to have it reprinted if there were some specific instructions I should have given.
0
Reply
Replying to @dougdaulton :
It looks like it’s intact, other than pushing it harder I’m not sure what else you could do. You could try reprinting and asking them to push it free while it’s still warm. If you’re going to do that you have nothing to lose by giving it a whack with something to try and free it off.
0
Reply
Printed the fully-vented variant in PLA and it mostly works but might be slightly more rigid than desired. Maybe PETG would have been preferable. I'm using it on a M75q-1 Tiny since it has the same layout, and seems to mostly fit. The issues I find are getting the front bezel to push far enough back to be properly "flush", but maybe the rigidity is preventing it from being pliable enough to slightly change to mold to the shape it needs to be. Also I'm not sure I exactly understand how the "power button" on this print works? Is it a functional button that can press inwards? I was a bit wary of pressing it too hard or breaking it free or something but could not find a way to safely get it "functional" in a way where it could actually reach far enough back to press the power button, even when I finally got the bezel mostly flush after some fiddling with it. I'm not super worried about it (since it stays on constantly anyway) but thought I'd mention it, it seems stuck/stationary to me
(Edited)
The designer has replied
0
Reply
I rend to agree the PETG would be slightly more malleable and fits better around the metal “tangs”. The switch does become functional but needs freeing up a little, brute force when not on the chassis.
1
Reply
Replying to @Reefie :
Thanks for the reply! I may eventually re-attempt in PETG once I have a chance to dry my PETG. Also good to know the button is functional- that's a really cool detail! I can always re-print so I'm not too worried about damage and I'll give it a bit of force and see if I can get it working.
0
Reply
I need to be able to fit a full size pcie card inside the case. Is there a way to raise the top a bit?
The designer has replied
designer
1
Reply
How would you reposition the pcie slot to get a full height card in there? Are you thinking ribbon extension or 2nd pcie riser?
0
Reply
Thanks you for the awesome model. It is a perfect fit on my m920q. I am having a problem with the power button. I have printed 2 flawless lids for my machines, but in both of them, the power button is stuck. Am I doing some thing wrong? I am printing with brim off and no supports. Any other options on the slicer that i am missing? Thanks !
The designer has replied
1
Reply
Hmmm, that’s strange. The only thing I can think it could be is damp filament, maybe you could be getting some stringing across the clearance. Could that be the case?
0
Reply
Boosted
Fully vented model printed out great!!!
The designer has replied
designer
1
Reply
Excellent, glad it worked out ok. Thanks for the boost, most appreciated. 👍
0
Reply
Hi, it does'nt fit on the M710q :/
The designer has replied
0
Reply
I’m so sorry, I’ll remove the reference until I can check the fit, I’m sure I have a m710q at work somewhere.
0
Reply
Replying to @Reefie :
No problem ^^ i print it twice but maybe it was me. If you make it work i will change my petg filament for another and retry ^
0
Reply

License

This user content is licensed under a Standard Digital File License.

You shall not share, sub-license, sell, rent, host, transfer, or distribute in any way the digital or 3D printed versions of this object, nor any other derivative work of this object in its digital or physical format (including - but not limited to - remixes of this object, and hosting on other digital platforms). The objects may not be used without permission in any way whatsoever in which you charge money, or collect fees.